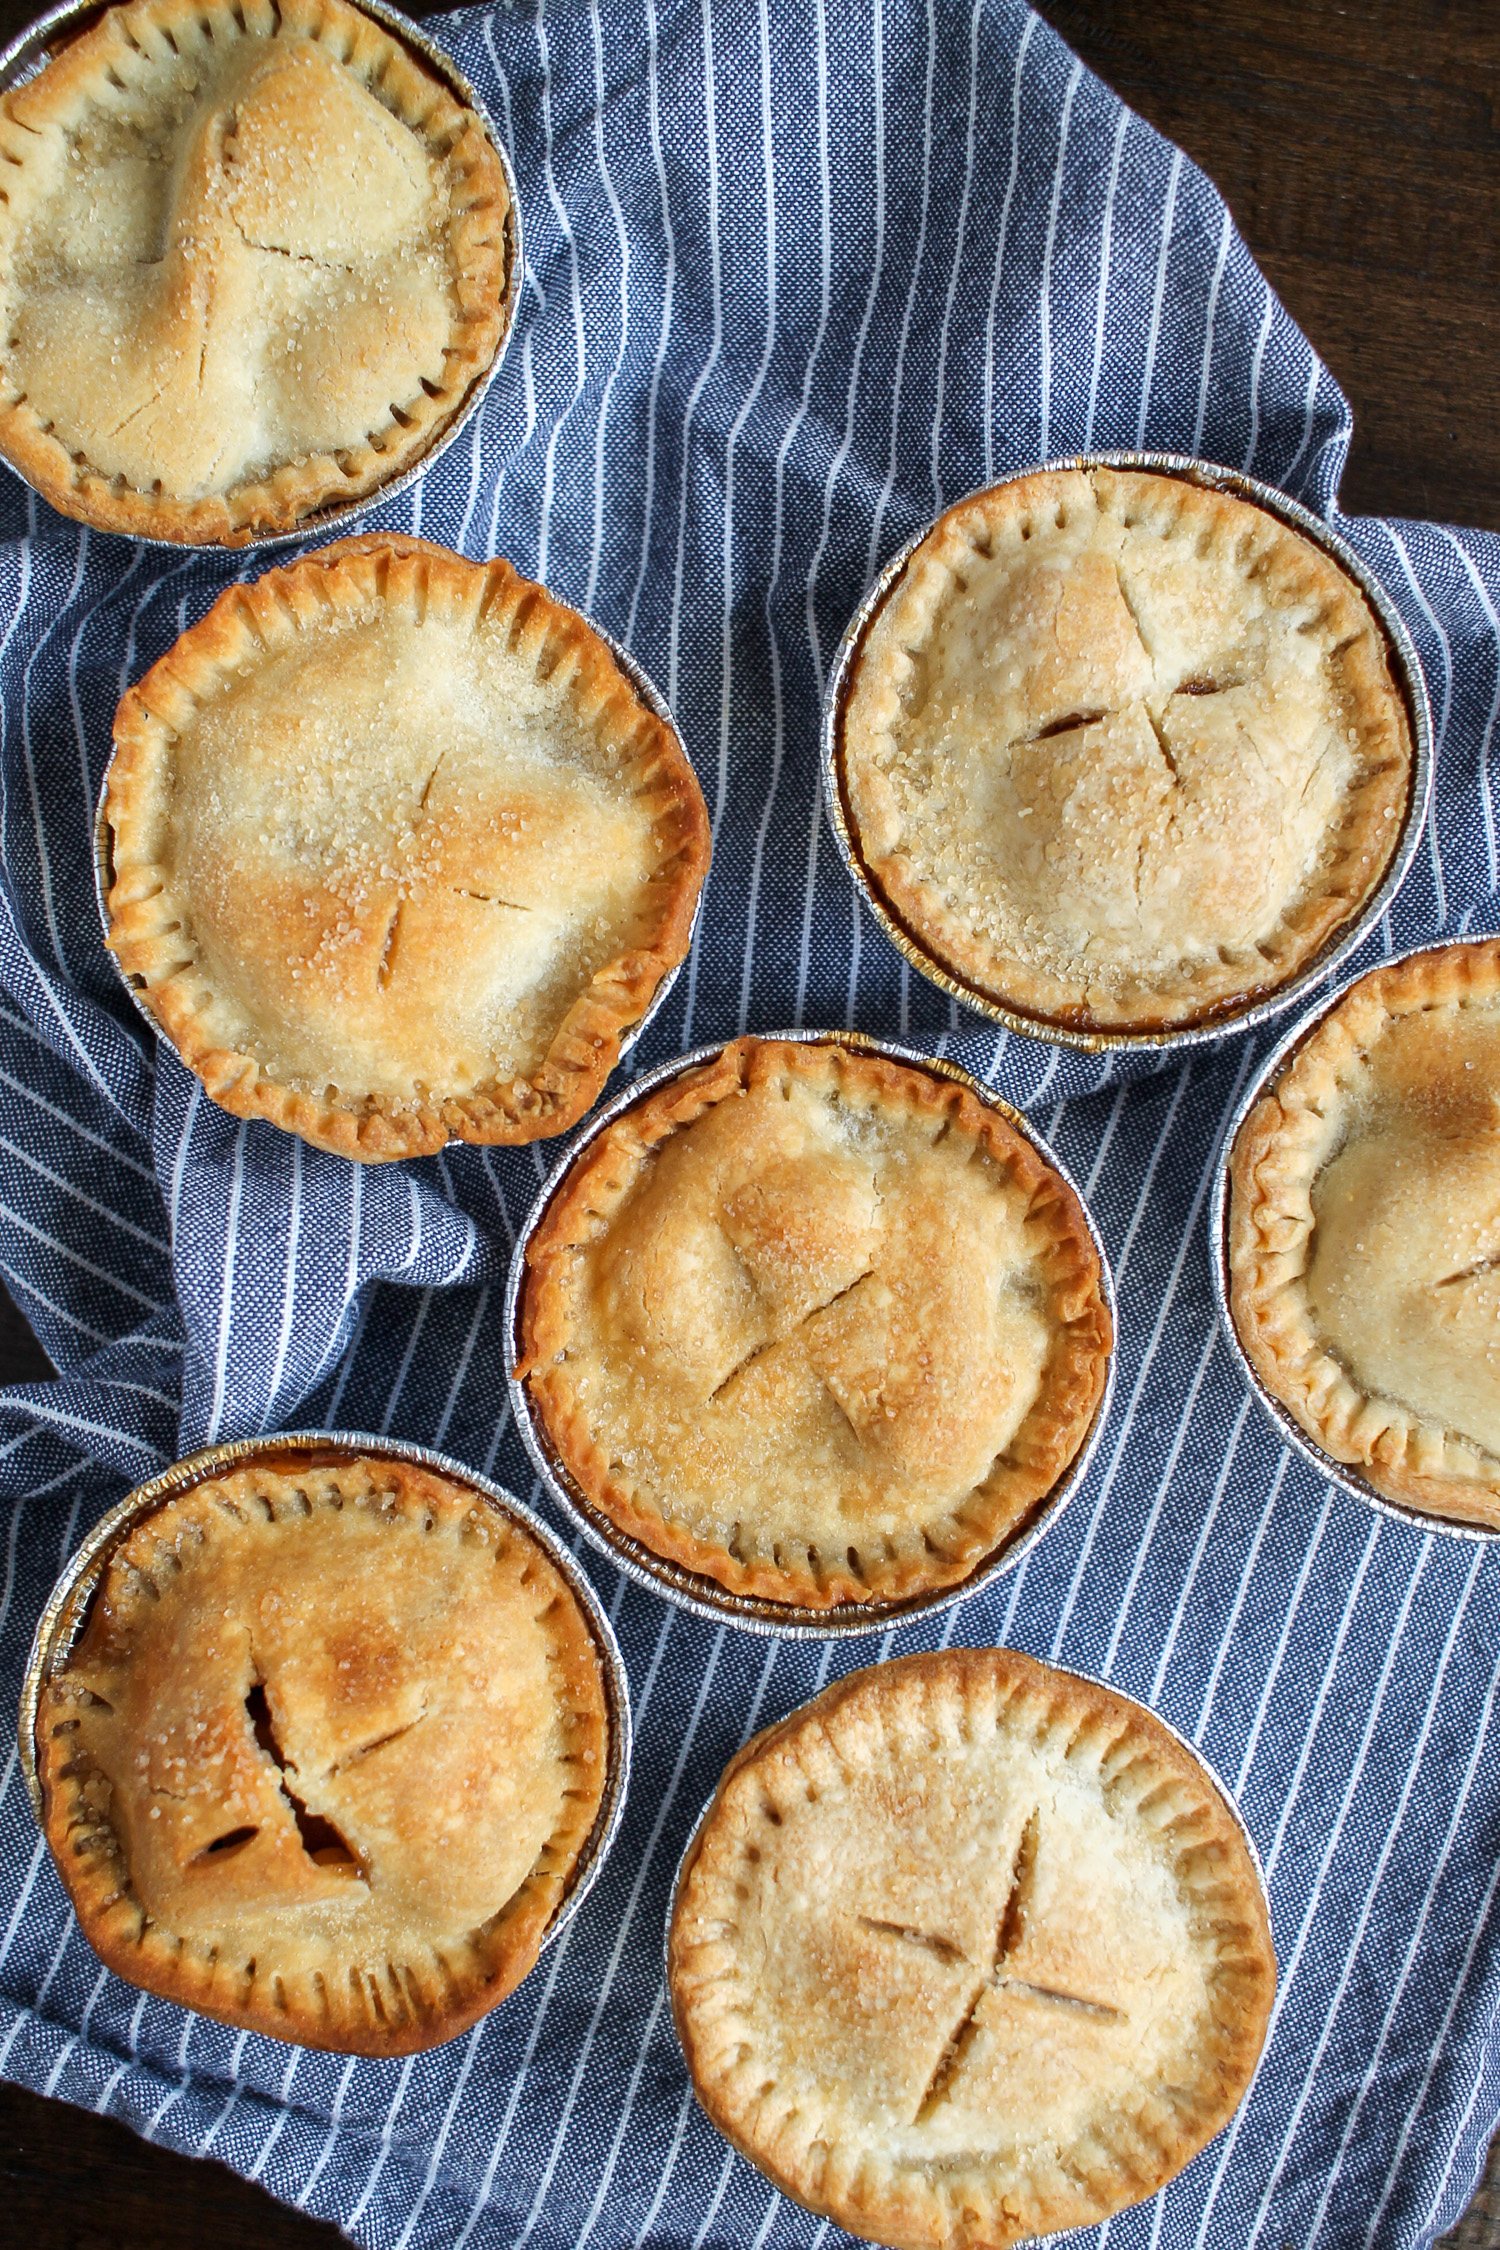
Mini Apple Pies: Perfect Bites Of Homemade Bliss
There’s something undeniably comforting and universally loved about a classic apple pie. The warm, spiced apple filling nestled within a flaky, golden crust evokes memories of home, holidays, and simple pleasures. But what if you could capture all that magic in a delightful, individual serving? Enter the world of mini apple pies – a charming, practical, and utterly delicious twist on a timeless dessert that’s perfect for any occasion. These petite pastries offer all the flavor and satisfaction of their larger counterparts, but with the added benefits of portion control, elegant presentation, and often, a quicker bake time. Whether you're hosting a dinner party, preparing treats for a bake sale, or simply craving a personal slice of heaven, mini apple pies are an absolute game-changer in the kitchen.
The allure of mini apple pies extends beyond their adorable size. They simplify serving, eliminate the need for messy slicing, and ensure every guest gets their own perfectly baked, picture-perfect pie. This article will guide you through everything you need to know to master these miniature marvels, from selecting the best apples to troubleshooting common baking dilemmas, ensuring your mini apple pies are nothing short of spectacular.
The Enduring Charm of Apple Pies: A Brief History
Before diving into the miniature versions, it's worth appreciating the rich history of the apple pie itself. Pies, in their earliest forms, were not primarily about dessert. Originating in medieval Europe, they were often savory, encased in thick, inedible pastry crusts (called "coffins") that served more as cooking vessels and preservation methods for meat fillings. Sweet pies, as we know them today, began to emerge in the 16th century, with fruit fillings becoming more common as sugar became more accessible.
Apple pie, specifically, gained immense popularity in England before making its way to America with early European settlers. Apples, being a staple crop, naturally found their way into these burgeoning sweet pies. Over centuries, the recipe evolved, with the crust becoming more delicate and edible, and the fillings more refined. The phrase "as American as apple pie" speaks volumes about its cultural significance, symbolizing wholesome, traditional values. The transition to mini apple pies is a modern adaptation, driven by convenience and aesthetic appeal, yet it carries forward the same comforting essence of its ancestors.
Why Go Mini? The Irresistible Advantages of Mini Apple Pies
While a large apple pie has its place, mini apple pies offer a host of benefits that make them incredibly appealing for both the baker and the consumer. Their compact size isn't just cute; it's highly functional.
- Perfect Portion Control: In an age where mindful eating is increasingly important, mini pies offer a built-in portion size. No more guessing how big a slice to cut, or dealing with uneven servings. Each person gets their own perfectly sized dessert.
- Elegant Presentation: Visually, individual mini apple pies are stunning. They add a touch of sophistication and charm to any dessert table, making them ideal for special occasions, holidays, or even just a thoughtful gift.
- Faster Baking Time: Smaller pies mean less time in the oven. This is a huge advantage, especially when you're short on time or baking multiple batches. While a full-sized pie might take an hour or more, mini pies can be ready in 20-30 minutes, depending on their size.
- Reduced Mess: Serving a large pie can be messy, with crumbs and filling spilling out. Mini pies eliminate this hassle, making for cleaner serving and easier cleanup.
- Customization Opportunities: Baking individual pies allows for slight variations in each one. You could experiment with different apple blends, spice levels, or even different toppings (some with lattice, some with crumble) to cater to various preferences.
- Portability: These little gems are incredibly easy to transport, whether you're taking them to a potluck, a picnic, or packing them in a lunchbox.
The Anatomy of a Perfect Mini Apple Pie: Elements of Excellence
Achieving mini apple pie perfection relies on three key components working in harmony: the crust, the filling, and the topping. Each element plays a crucial role in the overall taste and texture.
The Crust: The Flaky Foundation
A truly great apple pie starts with an exceptional crust. For mini apple pies, flakiness is paramount, providing a delightful contrast to the soft filling. Whether you opt for a classic all-butter crust, a shortening-based crust for extra tenderness, or a combination, the principles remain the same: cold ingredients, minimal handling, and proper chilling. The butter (or fat) should be cut into the flour, creating small pockets that, when baked, release steam and create those coveted flaky layers. Overworking the dough develops gluten, leading to a tough crust – the opposite of what we want for a delicate mini pie.
The Filling: The Heart of the Pie
The apple filling is where the magic truly happens. It needs to be perfectly spiced, sweet but not cloyingly so, and have a pleasant texture – tender but not mushy. The choice of apples, the blend of spices, and the right amount of thickener are all critical. A good filling should hold its shape when cut, without being runny, but still be juicy and flavorful.
The Topping: The Finishing Touch
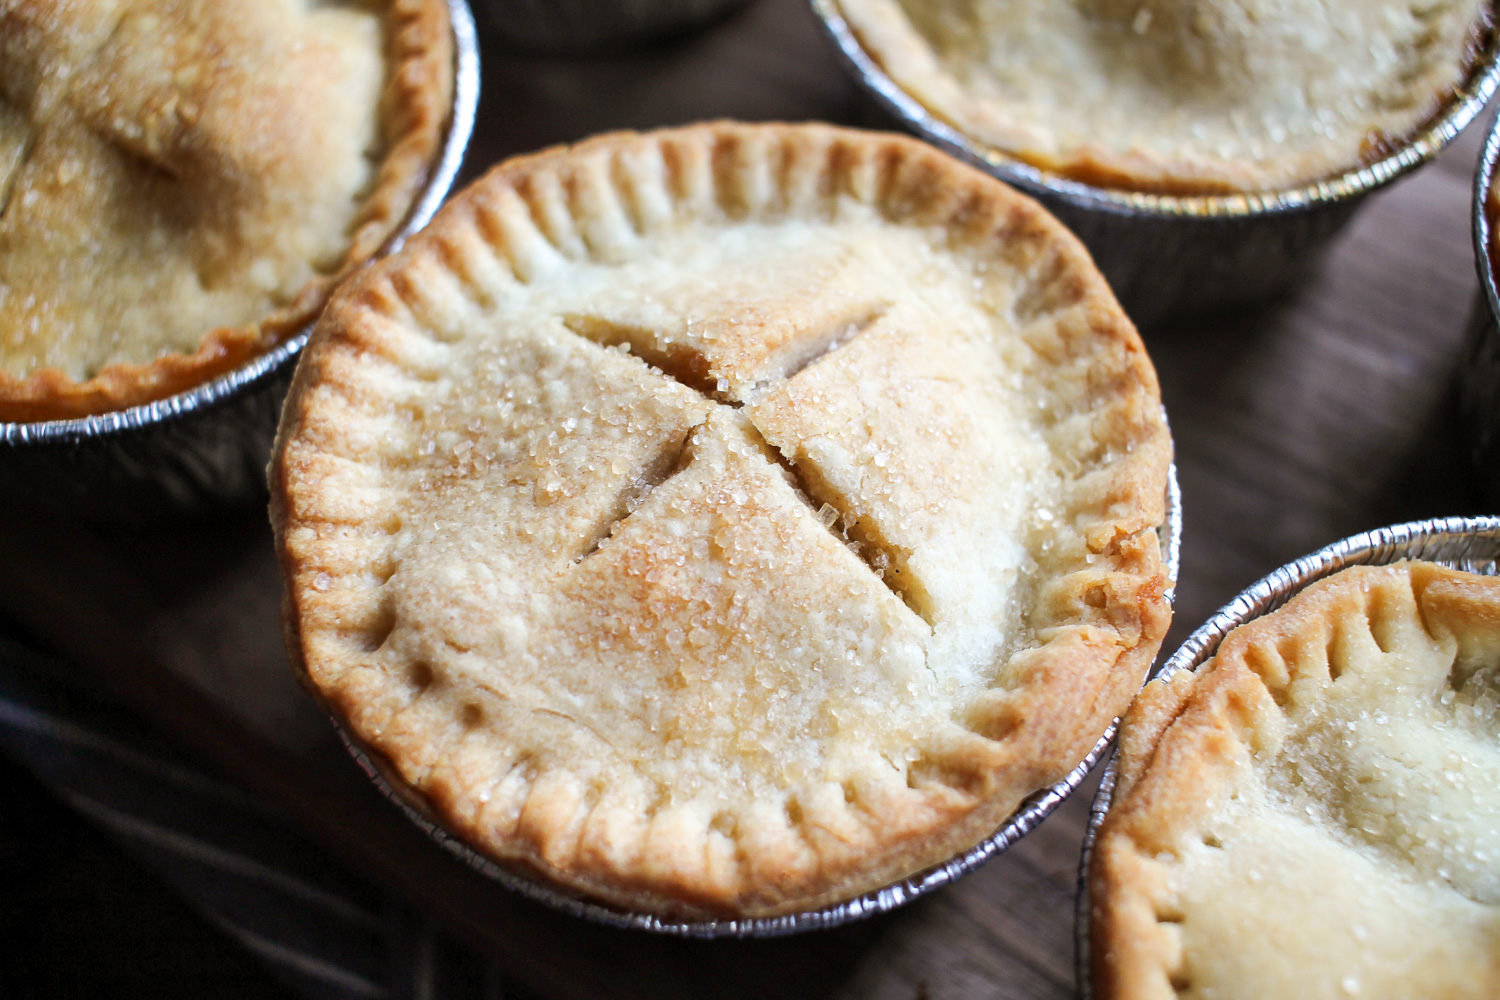
The topping adds another layer of texture and visual appeal. Common choices for mini apple pies include a full top crust (often vented or decorative), a classic lattice top (which allows steam to escape and showcases the filling), or a crumble topping (made from butter, flour, and sugar, offering a delightful crunchy contrast). Each option provides a unique experience and aesthetic.
Choosing Your Apples: The Core of the Flavor
The type of apple you choose dramatically impacts the flavor and texture of your mini apple pies. Not all apples are created equal when it comes to baking. You want apples that hold their shape well during baking and offer a good balance of tartness and sweetness.
- Granny Smith: A classic choice for pies due to its firm texture and tartness, which balances the sweetness of the sugar and spices. It holds its shape exceptionally well.
- Honeycrisp: Sweet, crisp, and holds its shape beautifully. It's a popular all-around apple that works wonderfully in pies.
- Braeburn: Offers a good balance of sweet and tart, with a firm texture.
- Fuji: Sweet and crisp, it maintains its texture well during baking.
- Golden Delicious: Softer than some, but sweet and aromatic. Best used in combination with firmer, tarter apples.
- Pink Lady: A good balance of sweet and tart, with a firm texture.
For the best results, many experienced bakers recommend using a combination of two or three different apple varieties. This blend creates a more complex flavor profile and varied texture in your filling. For instance, combining tart Granny Smiths with sweet Honeycrisps or Fujis provides a perfect equilibrium. Always peel, core, and slice your apples uniformly to ensure even cooking.
Crafting the Crust: A Foundation of Flakiness for Mini Apple Pies
Making a flaky pie crust from scratch might seem daunting, but with a few key techniques, you can achieve professional-level results for your mini apple pies. The beauty of mini pies is that any mistakes are contained to a small area, making it less intimidating to practice your crust-making skills.
Key Ingredients: * All-Purpose Flour: The base of your crust. * Cold Butter (or Shortening): This is crucial. Cold fat creates steam pockets during baking, leading to flakiness. Cut it into small cubes or grate it. * Ice Water: Just enough to bring the dough together. The cold temperature keeps the butter from melting. * Salt: Enhances flavor.
Techniques for Success: 1. Keep Everything Cold: Your butter, water, and even your hands should be as cold as possible. Some bakers even chill their flour and mixing bowl. 2. Don't Overmix: Mix just until the dough comes together. Overmixing develops gluten, which makes the crust tough. You should still see visible pieces of butter throughout the dough. 3. Chill, Chill, Chill: After mixing, flatten the dough into a disc, wrap it tightly, and chill it for at least 30 minutes (or up to two days). This allows the gluten to relax and the fat to firm up, making it easier to roll and preventing shrinkage during baking. 4. Rolling and Cutting: For mini pies, you'll need to roll your dough thinly. Use a round cookie cutter, a drinking glass, or the rim of your muffin tin to cut out circles slightly larger than your molds. You can use muffin tins, ramekins, or even specific mini pie pans. Lightly grease your chosen molds.
While homemade crust is superior, high-quality store-bought pie crusts are a perfectly acceptable shortcut, especially when time is of the essence. Just be sure to choose a brand known for good flavor and texture.
The Filling: A Symphony of Sweet and Spice for Your Mini Apple Pies
Once your apples are chosen and prepped, it's time to create the luscious filling that will make your mini apple pies truly shine. The balance of sweetness, tartness, and aromatic spices is key.
Ingredients for the Filling: * Sliced Apples: As discussed, a mix of varieties is best. * Sugar: Granulated sugar, brown sugar, or a mix. Brown sugar adds a deeper, caramel-like note. * Spices: Cinnamon is essential. Nutmeg, allspice, cloves, and a pinch of ginger can add complexity. Adjust to your preference. * Thickener: All-purpose flour, cornstarch, or tapioca starch. This prevents a runny filling. Cornstarch provides a clear, glossy finish, while flour gives a more opaque, traditional look. * Lemon Juice: A squeeze of lemon juice brightens the flavors and prevents the apples from browning. * Optional Enhancers: A touch of vanilla extract, a tablespoon of butter, or even a splash of brandy or bourbon can elevate the flavor profile.
Preparation: 1. Combine: In a large bowl, gently toss the sliced apples with the sugars, spices, thickener, and lemon juice until the apples are evenly coated. 2. Pre-cook (Optional but Recommended): For mini pies, sometimes pre-cooking the apples slightly can prevent them from shrinking too much in the oven and ensure a tender filling without a gap between the crust and the apples. Sauté the apple mixture in a pan for 5-7 minutes until slightly softened. Let cool before filling. This also helps meld the flavors. 3. Taste and Adjust: Before filling, taste a small piece of apple (if not pre-cooked) or a bit of the sauce. Adjust sugar or spices as needed. Remember, the flavors will concentrate during baking.
Assembly and Baking: Bringing Your Mini Apple Pies to Life
This is where all your preparation comes together. Careful assembly and precise baking are crucial for perfect mini apple pies.
Assembly Steps: 1. Prepare Molds: Lightly grease your muffin tins, ramekins, or mini pie pans. 2. Line with Crust: Gently press your cut-out dough circles into the prepared molds, ensuring they fit snugly without tearing. Trim any excess dough, leaving a slight overhang if desired for crimping. 3. Fill: Spoon the apple filling into each crust-lined mold. Don't overfill, as the apples will expand slightly. 4. Add Topping: * Full Top Crust: Place another dough circle over the filling. Crimp the edges with a fork or your fingers to seal. Cut a few small slits in the top to allow steam to escape. * Lattice Top: Cut thin strips of dough and weave them over the filling in a lattice pattern. Trim and crimp the edges. * Crumble Top: Sprinkle your prepared crumble mixture generously over the apple filling. 5. Egg Wash & Sugar (Optional): For a golden, shiny crust, brush the top crust (or lattice) with an egg wash (one egg beaten with a tablespoon of water or milk). You can also sprinkle a little coarse sugar on top for extra sparkle and crunch.
Baking: 1. Preheat Oven: Preheat your oven to a relatively high temperature, usually 400°F (200°C), then reduce it after the initial bake. This helps crisp the crust. 2. Bake Time: Place the mini pies on a baking sheet. Bake for 15-20 minutes at 400°F (200°C), then reduce the temperature to 375°F (190°C) and continue baking for another 10-20 minutes, or until the crust is golden brown and the filling is bubbling. The exact time will depend on the size of your mini pies and your oven. 3. Signs of Doneness: The crust should be deeply golden, and the filling should be visibly bubbling through any vents or lattice. If using a full top, you can gently poke a skewer through a vent to check if the apples are tender. 4. Cooling: Let the mini apple pies cool in their molds for 10-15 minutes before carefully removing them to a wire rack to cool completely. This prevents them from sticking and helps the filling set.
Troubleshooting Common Mini Pie Problems and How to Fix Them
Even experienced bakers encounter issues. Here are some common mini apple pie problems and how to address them:
- Soggy Bottom Crust: * Cause: Too much moisture from the filling, underbaking, or not preheating the oven hot enough. * Solution: Ensure your filling isn't too wet (use enough thickener). Bake on a lower rack for more direct heat to the bottom. Blind bake your crusts for 5-10 minutes before adding filling. Ensure oven is fully preheated.
- Runny Filling: * Cause: Not enough thickener, or apples releasing too much liquid. * Solution: Increase the amount of thickener (flour, cornstarch, or tapioca). Pre-cooking apples slightly can help release some liquid beforehand.
- Crust Shrinking: * Cause: Overworking the dough, or not chilling it enough. * Solution: Handle the dough minimally. Always chill the dough thoroughly before rolling and after placing it in the molds.
- Over-Browning of Crust: * Cause: Too high a temperature, or too long baking. * Solution: If the crust is browning too quickly, loosely tent the pies with aluminum foil. Reduce oven temperature if consistently over-browning.
- Apples Still Hard: * Cause: Underbaking, or using very firm apples without pre-cooking. * Solution: Extend baking time. Ensure filling is bubbling, indicating it's hot enough to cook the apples. Consider pre-cooking very firm apple varieties.
Serving and Storing Your Mini Masterpieces
Once your mini apple pies are baked to golden perfection, the waiting game begins. It's crucial to let them cool properly before serving to allow the filling to set and prevent a messy experience.
- Cooling: Allow mini apple pies to cool on a wire rack for at least 30 minutes, or even longer, before serving. The filling will continue to thicken as it cools.
- Serving Suggestions: * Classic: A scoop of vanilla bean ice cream or a dollop of freshly whipped cream. * Decadent: A drizzle of warm caramel sauce. * Simple: A dusting of powdered sugar or a sprinkle of cinnamon.
- Storage: * Room Temperature: Mini apple pies can be stored at room temperature for up to 2 days, loosely covered. * Refrigerator: For longer storage, refrigerate for up to 4-5 days. * Freezing: Baked mini apple pies freeze beautifully. Wrap individual pies tightly in plastic wrap, then aluminum foil, and place in a freezer-safe bag or container for up to 3 months. Thaw at room temperature and reheat gently in the oven for best results.
- Reheating: To reheat, place pies on a baking sheet in a preheated oven at 300-350°F (150-175°C) for 10-15 minutes, or until warmed through.
Food Safety and Best Practices for Baking
Ensuring food safety is paramount in any kitchen endeavor, especially when baking. Following best practices ensures your mini apple pies are not only delicious but also safe to consume.
- Cleanliness: Always start with clean hands, utensils, and work surfaces. Wash hands thoroughly before and during food preparation.
- Ingredient Freshness: Use fresh, good-quality ingredients. Check expiration dates on butter, flour, and other perishable items. Inspect apples for any signs of spoilage.
- Cross-Contamination: If you're handling raw meat or poultry in the same kitchen, ensure separate cutting boards and utensils are used, and thoroughly clean surfaces afterwards. (Less relevant for pies, but a general kitchen rule).
- Proper Cooking Temperatures: Ensure your oven is calibrated correctly to bake the pies at the recommended temperature. The internal temperature of the filling should reach a safe level, typically indicated by vigorous bubbling.
- Cooling and Storage: As mentioned, cool pies properly before storing. Store perishable ingredients and baked goods at appropriate temperatures to prevent bacterial growth. If pies contain dairy (like cream in a crumble topping or if served with ice cream), be mindful of how long they sit at room temperature.
- Allergens: Be aware of common allergens like wheat (flour) and dairy (butter) if serving to guests with dietary restrictions.
Variations and Creative Twists on Mini Apple Pies
Once you've mastered the classic mini apple pie, don't hesitate to experiment! The "mini" format lends itself well to creative variations.
- Different Fruit Fillings: * Mini Berry Pies: Use mixed berries (blueberries, raspberries, blackberries) for a vibrant, tart-sweet filling. * Mini Cherry Pies: A classic alternative, especially with sour cherries. * Mini Peach or Pear Pies: Delightful in season.
- Spiced Variations: * Add a pinch of cardamom, ginger, or even a tiny amount of black pepper for an unexpected kick to your apple filling. * Infuse your butter for the crust with cinnamon or vanilla.
- Crust Variations: * Whole Wheat Crust: For a nuttier flavor and added fiber. * Gluten-Free Crust: Use a reliable gluten-free pie crust recipe or mix. * Nut Crust: Incorporate finely ground nuts (like pecans or walnuts) into your crumble topping or even the crust dough.
- Savory Mini Pies: While this article focuses on sweet, the "mini pie" concept extends beautifully to savory options like mini chicken pot pies, quiches, or shepherd's pies.
Table of Contents
- Mini Apple Pies: Perfect Bites of Homemade Bliss
- The Enduring Charm of Apple Pies: A Brief History
- Why Go Mini? The Irresistible Advantages of Mini Apple Pies
- The Anatomy of a Perfect Mini Apple Pie: Elements of Excellence
- Choosing Your Apples: The Core of the Flavor
- Crafting the Crust: A Foundation of Flakiness for Mini Apple Pies
- The Filling: A Symphony of Sweet and Spice for Your Mini Apple Pies
- Assembly and Baking: Bringing Your Mini Apple Pies to Life
- Troubleshooting Common Mini Pie Problems and How to Fix Them
- Serving and Storing Your Mini Masterpieces
- Food Safety and Best Practices for Baking
- Variations and Creative Twists on Mini Apple Pies
- Conclusion: The Sweet Satisfaction of Mini Apple Pies
Conclusion: The Sweet Satisfaction of Mini Apple Pies
From their charming appearance to their perfectly portioned deliciousness, mini apple pies are a testament to how small changes can lead to big improvements in the culinary world. We've explored the rich history of pies, delved into the many advantages of going miniature, and meticulously detailed every step of the baking process – from selecting the ideal apples and crafting a flaky crust to assembling and baking these delightful treats. We've also covered essential troubleshooting tips and food safety practices, ensuring your baking journey is both successful and safe.
Whether you're a seasoned baker or just starting out, creating mini apple pies is a rewarding experience that yields impressive results. They are versatile, customizable, and always a crowd-pleaser. So, gather your ingredients, preheat your oven, and embark on your own mini apple pie adventure. Share your creations with loved ones, experiment with new flavors, and most importantly, savor every single bite of these perfect individual desserts. Have you tried making mini apple pies before? What are your favorite apple combinations or crust tips? Share your thoughts and experiences in the comments below, and don't forget to explore our other baking guides for more delicious inspiration!
Mini Apple Pies - An Easy Recipe for Individual Apple Pies
Mini Apple Pies - An Easy Recipe for Individual Apple Pies

Mini Apple Pies - An Easy Recipe for Individual Apple Pies
