Unlock The Beauty: Your Guide To Mastering Lily Flower Drawing
Table of Contents
- The Allure of Lilies: Why Draw Them?
- Understanding Lily Anatomy for Accurate Drawing
- Exploring the Diversity of Lilies in Your Art
- Essential Tools and Techniques for Lily Flower Drawing
- Mastering Light, Shadow, and Texture in Lily Art
- Compositional Secrets for Stunning Lily Drawings
- From Observation to Masterpiece: Tips for Aspiring Artists
- Nurturing Your Artistic Journey with Lilies
The Allure of Lilies: Why Draw Them?
The captivating beauty of lilies has enchanted artists, poets, and gardeners for centuries. Adored by florists and gardeners everywhere, lilies are delightfully flamboyant with gorgeous flowers and heady perfume. Renowned for their big, bold blooms in scrumptious colors, they offer an incredible range of visual stimuli. For an artist, this translates into a wealth of opportunities to practice various drawing techniques, from capturing delicate curves to rendering vibrant hues. The challenge and reward of accurately depicting their unique forms make **lily flower drawing** an incredibly satisfying pursuit. Lilies are typically quite tall and are perennials, meaning they return year after year, offering a consistent source of inspiration for those with gardens. Most lilies grow from a bulb, which forms the foundation of their strong, upright stems. This inherent structure provides a fantastic framework for understanding their growth patterns and translating them into a two-dimensional drawing. The sheer variety, from the dainty, purple pendent blooms of Lilium Martagon to the enormous, orange trumpets of 'Enchantment', ensures that you will never run out of unique subjects for your **lily flower drawing** practice.Understanding Lily Anatomy for Accurate Drawing
Before you even pick up your pencil, a fundamental understanding of lily anatomy will significantly enhance your **lily flower drawing**. Knowing how the plant grows and is structured allows you to draw with confidence and accuracy, making your art more believable and vibrant. Lilies are a genus of flowering plant with a distinct structure that contributes to their iconic appearance.From Bulb to Bloom: The Basic Structure
Lilies are herbaceous flowering plants, typically growing from a bulb. This bulb gives rise to a strong, often tall stem, which can reach impressive heights depending on the species. The leaves are usually arranged spirally along the stem, though some varieties might have whorled arrangements. Understanding the stem's sturdy nature and the way leaves emerge is crucial for establishing the foundational lines of your **lily flower drawing**. Think of the stem as the central axis, providing stability and direction for the blooms. The flowers themselves are typically borne at the top of the stem, either singly or in clusters. The way the flowers are arranged on the stem (e.g., upright, outward-facing, or pendulous) is a key characteristic of different lily types and should be carefully observed. For instance, the elegant Easter lily often has upward-facing, trumpet-shaped blooms, while the Martagon lily features charmingly downward-facing, recurved petals. Capturing these subtle differences is what brings your **lily flower drawing** to life.Petals and Stamens: Capturing Intricate Details
The most striking feature of any lily is, of course, its flower. Lilies typically have six petals (or tepals, as they are botanically called, because sepals and petals are indistinguishable) arranged in two whorls of three. These petals can be broad, narrow, recurved, or cup-shaped, and their unique forms contribute significantly to the character of each species. For instance, the vibrant tiger lily is famous for its dramatically recurved petals, often speckled with dark spots, which make for a dynamic **lily flower drawing**. Inside the petals, you'll find the reproductive organs: six prominent stamens, each topped with an anther usually laden with pollen, and a single pistil in the center. The anthers are often a contrasting color to the petals, adding another layer of visual interest. Pay close attention to the length and curve of the stamens, and the delicate stigma at the tip of the pistil. These small details, when accurately rendered, add depth, realism, and a touch of botanical accuracy to your **lily flower drawing**.Exploring the Diversity of Lilies in Your Art
The world of lilies is incredibly vast and varied, offering an artist an almost inexhaustible supply of subjects. We've pulled together a list of 40 different types of lilies with photos, including favorites like calla lilies and different colored lilies including white ones, purple, orange, and more. This rich diversity means your **lily flower drawing** can explore a wide spectrum of shapes, sizes, and color palettes.Trumpets, Tigers, and Callas: Distinctive Forms
The "Data Kalimat" highlights several distinct lily types, each with unique forms that challenge and inspire an artist: * **Trumpet Lilies:** As the name suggests, these lilies boast large, trumpet-shaped blooms, often highly fragrant. Their grand, open form makes for a dramatic **lily flower drawing**, allowing you to focus on the deep throat of the flower and the graceful flare of the petals. * **Tiger Lilies:** From the vibrant tiger lily to the elegant Easter lily, these are iconic. Tiger lilies are easily recognizable by their recurved petals and characteristic dark spots. Capturing their energetic, almost wild appearance requires a keen eye for dynamic lines and textural details in your **lily flower drawing**. * **Calla Lilies:** While technically not true lilies (they belong to the genus Zantedeschia), they are often grouped with lilies due to their popular name and similar elegance. Their unique, spathe-and-spadix structure offers a minimalist yet powerful form to draw, emphasizing smooth curves and contrasting textures. * **Martagon Lilies:** With their dainty, purple pendent blooms, Martagons offer a different challenge. Their downward-facing, often turban-shaped flowers require careful attention to perspective and the way light plays on their recurved petals. * **Native North American Lilies:** Explore 22 native North American lilies, including favorites like Turks Cap, Trout, and Wild Tiger Lily. These often have a more rustic, natural charm, perfect for artists interested in botanical illustration or capturing the essence of wildflowers. By studying these different forms, you can expand your repertoire and develop a versatile approach to **lily flower drawing**.A Kaleidoscope of Colors: White, Purple, Orange, and Beyond
Beyond their forms, lilies present a stunning array of colors. The "Data Kalimat" mentions white, purple, and orange lilies, but the spectrum is far wider, encompassing reds, yellows, pinks, and even bi-colors. This provides an excellent opportunity to experiment with color theory and shading in your **lily flower drawing**. * **White Lilies:** Often associated with purity and elegance, white lilies (like the Easter lily) are a masterclass in rendering subtle shades and highlights. Drawing a white lily isn't about simply leaving the paper blank; it's about depicting the nuances of light and shadow that define its form and texture. * **Purple Lilies:** From deep regal purples to soft lavenders, these add a touch of mystery and sophistication. Understanding how purple pigments interact with light will be crucial for a compelling **lily flower drawing**. * **Orange Lilies:** The enormous, orange trumpets of 'Enchantment' or the fiery hues of a tiger lily demand attention. These vibrant colors allow for bold strokes and rich layering, bringing a sense of energy and warmth to your artwork. By carefully observing the color variations, the way light hits the petals, and the subtle shifts in hue, you can bring an incredible sense of realism and vibrancy to your **lily flower drawing**.Essential Tools and Techniques for Lily Flower Drawing
To begin your **lily flower drawing** journey, you don't need an overwhelming array of tools. Simplicity often yields the best results, especially when focusing on observation and technique. * **Pencils:** A range of graphite pencils (e.g., 2H, HB, 2B, 4B, 6B) will allow you to create varied line weights and a full spectrum of tonal values. For initial sketches, a lighter pencil like 2H is ideal, while softer pencils (B grades) are perfect for shading and creating darker areas. * **Paper:** Choose a smooth to medium-tooth drawing paper that can withstand erasing and layering. * **Erasers:** A kneaded eraser is excellent for lifting graphite without damaging the paper, and a vinyl eraser for precise corrections. * **Reference Images:** While drawing from life is ideal, high-quality photographs are invaluable. Look for images that clearly show the lily's form, light source, and details. The "stunning photos" mentioned in the data can serve as excellent starting points. **Basic Drawing Techniques:** 1. **Observation:** Spend time truly looking at the lily. Notice its overall shape, the angle of its stem, how the petals unfurl, and where the light hits. This is the most critical step in any **lily flower drawing**. 2. **Basic Shapes:** Start by breaking down the lily into simple geometric forms (circles, ovals, cylinders) to establish its proportions and placement on the page. 3. **Construction Lines:** Lightly sketch the central axis of the stem and the general outline of the flower head. 4. **Refining Forms:** Gradually refine these basic shapes into the specific contours of the petals, leaves, and stem. 5. **Adding Details:** Once the main forms are established, add the intricate details like stamens, pistils, veins on petals, and any unique markings (like the spots on a tiger lily). 6. **Shading:** Begin building up tonal values to create depth and dimension.Mastering Light, Shadow, and Texture in Lily Art
The difference between a flat drawing and a vibrant **lily flower drawing** often lies in the artist's ability to render light, shadow, and texture. These elements give your drawing a three-dimensional quality and bring the lily to life on the page. * **Light and Shadow:** Observe where the light source is coming from and how it creates highlights, mid-tones, and shadows on the lily. Highlights will be the brightest areas, often where the light directly hits the waxy surface of the petals. Mid-tones form the general color of the petals, and shadows define the curves, overlaps, and hidden areas. Use a range of pencil grades to create a smooth transition between these values. For instance, the "big, bold blooms" of lilies create dramatic shadows within their folds, which you can emphasize. * **Form and Volume:** Shading isn't just about making things dark; it's about creating the illusion of form. Curved petals will have a gradient of light to shadow, indicating their roundness. The trumpet shape of many lilies means the inside will often be in shadow, gradually lightening towards the opening. * **Texture:** Lilies have surprisingly varied textures. Petals can be smooth and waxy, almost translucent, while stems might have a slight roughness. The anthers are often powdery with pollen. Use different pencil strokes and pressure to suggest these textures. For a smooth petal, use gentle, even strokes. For a powdery anther, a stippling or very light, feathery touch might work better. Capturing the "delightfully flamboyant" nature often involves emphasizing these textural contrasts.Compositional Secrets for Stunning Lily Drawings
A successful **lily flower drawing** isn't just about drawing a single flower well; it's also about how that flower (or group of flowers) is arranged on the page. Composition is key to creating a visually appealing and impactful artwork. * **Rule of Thirds:** Imagine dividing your drawing surface into a 3x3 grid. Placing key elements (like the main lily bloom or a cluster of buds) along these lines or at their intersections often creates a more dynamic and balanced composition than simply centering everything. * **Leading Lines:** The strong, tall stems of lilies naturally act as leading lines, guiding the viewer's eye through the drawing. Use them to direct attention towards the main flower or to create a sense of movement. * **Negative Space:** Pay attention to the empty space around your lily. This "negative space" is just as important as the positive space (the lily itself). It helps define the form of the lily and can contribute to the overall mood of the drawing. * **Varying Scale and Overlap:** If you're drawing multiple lilies, vary their sizes and allow some to overlap others. This creates depth and a more natural, organic feel. The "Data Kalimat" mentions "blending early, midseason, and late varieties of lily into your garden," which suggests varying stages of bloom – an excellent compositional element for a multi-lily drawing. * **Focal Point:** Decide what the most important part of your **lily flower drawing** is. Is it a particular bloom, a cluster of buds, or the intricate details of a single stamen? Make sure this focal point stands out, perhaps through sharper detail, stronger contrast, or strategic placement.From Observation to Masterpiece: Tips for Aspiring Artists
The journey of **lily flower drawing** is one of continuous learning and refinement. Here are some practical tips to help you move from initial sketches to more accomplished artworks: * **Draw from Life (When Possible):** While photos are useful, nothing beats drawing from a live lily. You can observe it from multiple angles, see how light truly interacts with its form, and even appreciate its fragrance, which can inspire your artistic interpretation. Get planting tips and view stunning photos to cultivate your own inspiration. * **Practice Regularly:** Consistency is key. Even short drawing sessions a few times a week will yield significant improvements over time. * **Study Botanical Illustrations:** Look at professional botanical illustrations of lilies. These often combine artistic beauty with scientific accuracy, providing excellent examples of how to render intricate details and forms. * **Experiment with Mediums:** While this article focuses on drawing, don't hesitate to explore other mediums once you're comfortable with pencil. Watercolors can beautifully capture the translucence of lily petals, while colored pencils can render their vibrant hues with precision. * **Don't Be Afraid of Mistakes:** Every artist makes mistakes. See them as learning opportunities. Embrace the process of trial and error. * **Learn about Lily Plant Care:** Understanding lily plant care to make the most of the beautiful blooms of species in the Lilium genus can deepen your appreciation for the plant, which in turn informs your drawing. Knowing how they grow, their preferred conditions, and their life cycle can add a layer of authenticity to your art.Nurturing Your Artistic Journey with Lilies
The enchanting world of lilies truly offers an inexhaustible source of inspiration for any artist. With their diverse forms, from the vibrant tiger lily to the elegant Easter lily, and their rich palette of colors, they provide endless opportunities for artistic exploration. By carefully observing their anatomy, understanding the interplay of light and shadow, and employing sound compositional principles, you can transform a simple piece of paper into a stunning **lily flower drawing**. We have a whole world of incredible lilies to introduce you to, and each one holds the potential for a unique artistic interpretation. Whether you are ready to take your garden from drab to fab with these exquisite plants or simply wish to capture their beauty on paper, the journey of drawing lilies is deeply rewarding. It not only refines your artistic skills but also deepens your connection to the natural world. So, pick up your pencil, find your favorite lily, and let its beauty guide your hand. What lily will you draw first? Share your thoughts and experiences in the comments below, or perhaps even share your own **lily flower drawing**!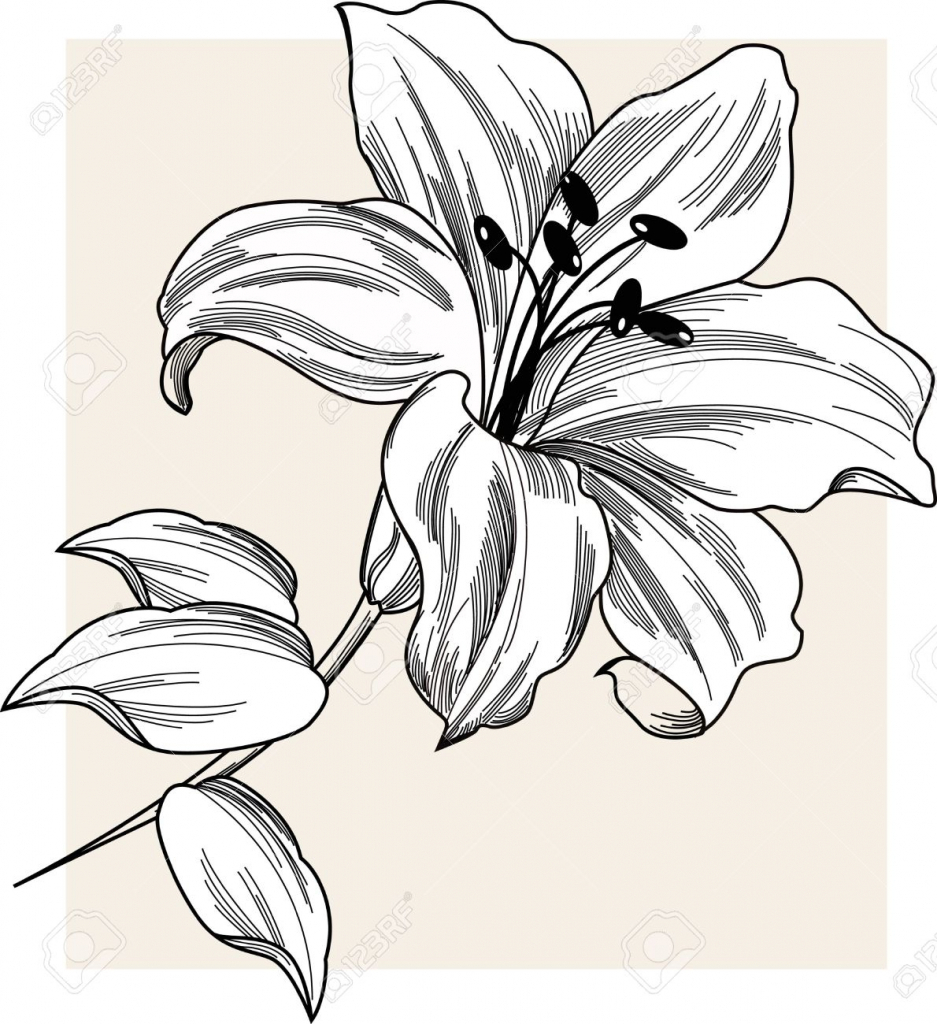
Lily Flower Drawing at GetDrawings | Free download

Lily Flower Line Drawing at GetDrawings | Free download
Lilies Flower Drawing at GetDrawings | Free download
